BLOG 4
- nsyirah04
- Aug 1, 2022
- 4 min read

Updated: Oct 23, 2022
Hi guys👋🏻😁! Whatsupppp, hope you guys enjoyed my previous blogs and will enjoy this too! In this blog, i will be sharing about my experience on practical 5. Practical 5 is which i was tasked to design and make a device that enables a raw quail egg to survive (no crack) a fall from a height of 2 metres🥚. In this activity, I designed my object in Fusion 360, converted files to the desired file types, changed the printing settings according to my design, operated the 3D printer and printed out my design.
Contents of this post:
1. How the object was designed in Fusion 360
2. How the object was 3D-printed
3. Design files for 3D-printed object
4. Pictures and videos of the 3D-printed object
5. Reflection
After searching online for some ideas, me and partner decided to make something like the ones showed below. However, after much considerations, we made some improvisation such as changing the egg container to be a cube instead and the stands around it to be replaced with a rectangular leg that has more surface area to land on the ground.

Final Sketch Design:

How the object was designed in Fusion 360
Step 1:
(i) Under Create, select "box”, then select any plane. Place the first corner.

(ii) Press "Tab" to toggle to the other dimension. Place the second corner and specify the length and width for the design (the length and width are 30mm each) then press enter.

Step 2: Drag the blue arrow up to the desired height (41 mm) and press enter.


Step 3: Select the Face of the body to put the hole, Click "Create"-> Click "Hole"
Enter the diameter and length of the hole which is 3.5mm and 6mm respectively.
Press "Enter"

Step 4: Repeat step 3 to add another hole at the bottom left.

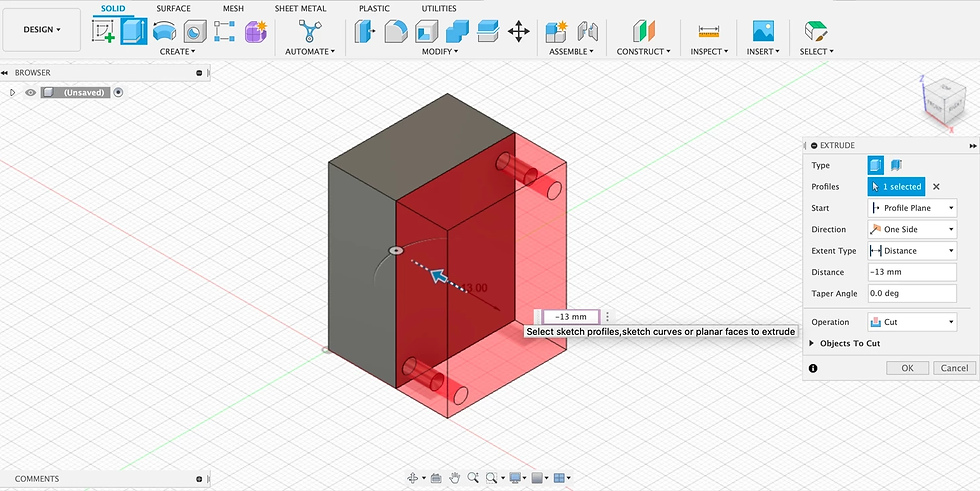
Step 5 (create poles): Click "Create"-> Click "Extrude" -> -13mm ->enter


Step 6: Repeat step 3 to create a hole at the top left and bottom right

Step 7 (sketching of legs):
i) Click " Create Sketch" -> Length:35mm, Width: 10mm->Press "Enter" ->Click " Create Sketch" Place the first corner below the rectangle and align it to its height.


ii) Turn the rectangle below the first rectangle to 45 degrees. Enter "Finish Sketch".

Step 8 (sketching of egg):
(i) Click "Create Sketch" . Click "Create"-> "Click"Ellipse"

Step 9:
i) Place Centre Point->Type "35mm" for length->Place the first axis point
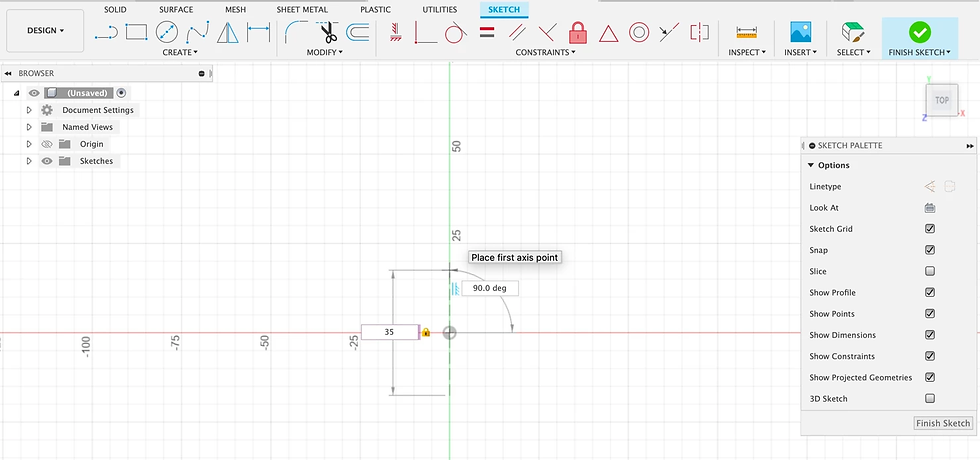
ii) Type "27mm" for diameter->Press "Enter" -> Click "Finish Sketch"


Step 10: Copy and Paste the sketch of the egg and legs.
Join the legs to the body.
Create the 'egg hole sketch' in the cube.


Step 11: Repeat steps 1-10 to create the other side of the object.
Final product:

How the object was 3D-printed
The workflow for printing out the object is:
a) Converting the 3D design into a 3D representable file (STL or 3MF)

b) Slicing the 3D representable file (STL or 3MF) into layers using Cura slicer software


c) Converting the layers into instructions for the 3D printer (GCode)
i) changing infill to 12%

d) Ensure that there is support

e) Click "Slice". To see the different layers, click on "Preview" and it should look like this.
The blue area circled in yellow shows that there is support.
Click "save to disk"-> as a gcode file.


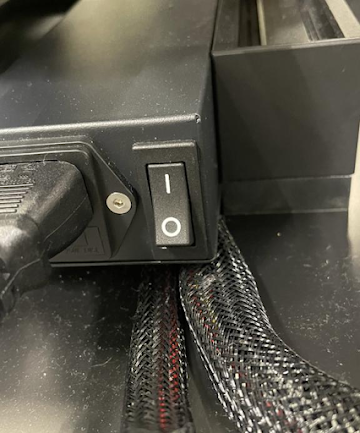
f) Setting up the 3D printer to prepare it for printing of the objects. These are the steps taken to print :
1. Turn on the main power source and turn on the 3D printer.
2) Take out the SD card from the adapter and insert it into the 3D printer. On the control panel, select "Print" --> select the file that has just been saved and press print.

Now we wait..............
Yay we finally have our product ready!! :

Embed version of device:
Pictures and videos of the 3D-printed object
Picture of the final product:

Side view:

Product with quail egg inside:


Video of egg drop challenge:
Reflection
This practical is yet another constructive experience. Although it was a tough one with alot of problems faced, me and my partner managed to successfully complete it without the egg cracking. Learning how to use fusion 360 was one of the struggles i faced during this experience. The hardest part was creating a sketch for the egg and making the egg hole in the cube and then adding the legs to the cube. With the help of YouTube and some of our friends, we managed to learn how to do that. Finally, we got our desired design. During the printing process, our print failed twice but we managed to adjust some settings during the printing, and it worked and we got our print which took between 2-3 hours


The image shown above was our first try, It was a fail and had no support. This was our first design, where we thought that only two legs would be sufficient but after we tried the egg drop challenge, we realised that it was not going to work and the egg would crack. So we added more legs so that there would be more surface area to land on and increase stability. This practical was a annoying one because the 3d printer is always being used and we had to rushed for the printer. However, this experience has been a beneficial one as i learnt how to use fusion 360 and 3d print , how cool is that? This experience will also help me with my fyp. Overall, I really enjoyed this activity a lot more than I thought I would. It was really fun learning about the different parts of the 3D printer that each has its own function in making the machine work.
You have finally come to the end of my blog !! Wasnt that a long one? but i hope you enjoyed it and stay tuned for my next one😎✌🏻

Comments